Tag Archives: woven wraps

How I wash a woven wrap

I happen to only own cotton wraps (for now!) so the process is pretty easy for me. Be aware, however, that different fibers require different care and washing/drying methods.

Today I wrapped my Girasol Avalon Diamond Weave size 5 woven wrap. I’ve been practicing a ton lately with Atticus and he gets an m&ms as a treat when he cooperates. He’s been doing really well…. But there’ve been a few times when I’ve ended up with chocolate in my hair and on the wrap. It’s been in need of a good washing!

IMG_7174.JPG

Washing
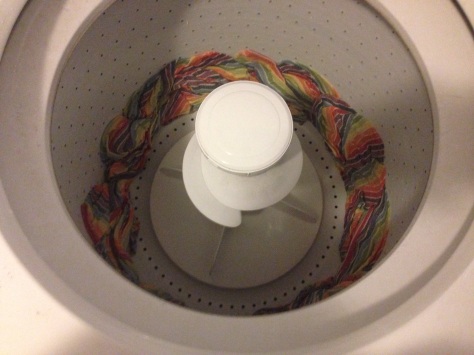
I threw the wrap into the washing machine on a gentle cycle with a small linen bag of soap nuts. Soap nuts are a natural way to wash things and I love them. I washed the Avalon solo because I don’t want it to get twisted up with anything else.

IMG_7171.JPG

After it was finished washing I let it set for a few minutes to let any leftover water drip off, then I checked it over to make sure all the grime came out and to check for any pulls or loose threads. All clear!

Drying
Here you have some options… I like to use the drying process as a way to beat my wraps into submission, plus I’m impatient, so I toss the wrap in the dryer on a low-heat cycle. I add my three Woolzies dryer balls to help break the wrap in. These natural wool dryer balls work as a fabric softener and also speed up the drying time.

Cotton things can shrink, though… So if you’re concerned you can also hang dry your wrap. The best option is, of course, using an outdoor clothes line… the sun makes it smell wonderful and frankly if you have access to a clothes line you should just always take advantage of it (we aren’t allowed them in my neighborhood, can ya tell I’m bitter?). If it’s rainy, cold, or you just don’t have an outdoor clothes line, you can also hang the wrap to dry in your shower or in your laundry room. Use hangers to loop the wrap accordion- style (see below) and just leave it be for awhile.

IMG_7172.JPG

And you’re done! Now it’s time to snuggle, hammock, or wrap with your woven 🙂

More Info
A few things…
•Be careful with your wrap and always check for pulls, loose threads, etc. before washing, between washing and drying, and after drying
•Do NOT use fabric softener or other scented washing accessories
•If you’re washing a ringsling wrap a sock or something around the rings when drying
•If you’re just wanting to break in your wrap there are other options, so don’t feel limited to washing
•If you’re not sure or insecure about washing, ask! Post on a forum or Facebook group or check the following resources:
Paxbaby washing instructions
Babywearing 102 washing and care

Making Your Own Woven Wrap for Babywearing

This past fall my mother and I embarked on a brave quest to make my own woven wrap so I could wrap my wee baby Atticus. I became addicted to babywearing just a few months after giving birth to Atticus in February of 2013. I bought a Moby when I had Trent and unfortunately never used it, and my mom bought me one as a gift prior to having Atticus. I was determined to learn how to wear this time around. I knew that having a newborn and a toddler at the same time could be hectic if I didn’t have a way to carry around the baby without wearing out my useless/non-existent arm muscles. Woven wraps can be super expensive, I quickly realized, and I thought making my own would be a cheap alternative addition.

Atticus and I Using Our Handmade Woven Wrap

I won’t bore you with my wrap purchases on this post, but be warned that they’ll surely come up soon. I have a handful and they’re gorgeous and soft and fun and cozy and useful and and and…

So anyway, my mom and I decided we were going to bang out a wrap on our own! Here’s how we did it.

Making your own woven wrap

Purchase your materials. You will want a sturdy but not-too-stretchy fabric. I used Osnaburg, but some people also use tablecloth material. I bought my Osnaburg from Hobby Lobby. The cost was $4.99 per yard, but they typically have a code you can enter for 40% off one item. You can also buy Osnaburg on Amazon for around $4.98/yard. I bought 10 yards, which would have been $49.90, but after applying the 40% off code my total before shipping was $29.90. I chose to purchase 10 yards was so that I’d have plenty, since I knew the Osnaburg would definitely shrink. I definitely wanted a size 6 wrap, which is 15.09 feet or 181.10 inches, or just over 5 yards. [Find more information about wrap sizes and other information about woven wraps on PAXbaby’s Woven Wrap Guide. Be warned… once you start poking around you’ll start losing hours before you realize it]. I figured buying so much extra would either leave me enough for a shorty or a ring sling, if I ever wanted to make a second wrap.

10 yards of Osnaburg is a whole lotta fabric!

Wash the fabric. First we washed the Osnaburg on hot and dried it on hot. Again, Osnaburg shrinks, and I wanted to leave plenty of room for shrinkage before measuring and cutting. Some people suggest you wash and dry 2-3 times, but I only did it one. I lost approximately 1/2 yard.

Choose your size and cut. Next, determine for sure what size you want your wrap to be. As I mentioned above, I wanted a size 6 (just over 181 inches). In addition to the 181 inches, we left extra fabric to allow for more shrinkage and for tapering the ends. Check out this nifty Babywearing102 Formal Investigate on Tapers to see different depths of taper by wrap maker. We measured 15 inches from each end so that, not including the tapers, the wrap measured 181 inches. Then, we cut on the diagonal so the tapers weren’t too deep.

Measuring the taper 15 inches deep
Cutting the Osnaburg on the diagonal for the taper

Serge or sew the edges. After the fabric was measured and cut my mom and I took turns serging the edges. If you’re not familiar, a serger uses 4 or more spools and has the capability to trim the edges to keep it clean and even. At the end of each side I tucked the four threads back into the serged edge with a needle, then added some fray check. (*If you don’t have a serger you could fold the edges under twice and then sew it for a nice seam. It would take a little more time to do that. You could also not sew or serge at all if you don’t mind slight fraying. Fraying doesn’t effect the integrity or strength of the wrap.)

The serger makes a nice clean cut and edge
The wrap as it is being serged

Attach a middle marker on the long edge. I wanted a middle marker on my wrap, so we took a piece of ribbon and folded it in half, then held it in place with pins until we got to that point of the fabric while serging. Needles can easily (and dangerously!) break with a serger, so we removed the needles and slowly serged over the ribbon to attach it.

The ribbon is serged on for a middle marker

You can see in the picture above that because we used four colors of thread on the serger the different sides of the wrap are obvious when up close; one side is primarily purple and the other side is primarily green. New babywearers (and some veterans, too) need to be able to see the difference between the sides so the wrap doesn’t get twisted. I also wanted to be able to tell the top from the bottom (again, to prevent twisting). With this in mind, we serged one long edge with the wrap turned over, so that the opposing thread colors were on the facing side.

It was not an easy project, but it also wasn’t as hard as I thought it would be, and it was very rewarding! I got to spend time with my mom, try out my new serger, and got a new baby wrap out of it! Maybe one of these days I’ll dye it. You can see below that Atty and I both love it!

A size 6 is quite long!
A close up view of the finished product
Atticus loves his new wrap!
A back view of the wrap job. Plenty of length.